Today’s film music and video game composers have access to thousands of virtual instruments from hundreds of different publishers. The offer is huge and suitable for most musical styles. However, it’s not so big compared to the infinite variety of acoustic musical instruments that exist in the world. This is why I often had to make my own virtual instruments to reproduce the sound of old, rare or unique instruments.
In this article, I will detail a method to sample an acoustic musical instrument. Keep in mind that depending on the instrument and the quality you want, sampling requires a huge amount of time. That’s why you should start with an simple instrument like a percussion (avoid church organ for your first try!)
Step 1: Set the recording
First of all, it is important to define your objectives: Which instrument will you sample? For what use? In which acoustic space? How much time do I have to record? Do I need to employ a musician?
How many samples?
For more realism, you should record the same note with several levels of velocity. On a piano for example, the timbre of a note changes depending on the speed you press a key. Two notes played soft or loud have very different timbres and overtones.
Pristine virtual instruments have several levels of velocity per note and sometimes several different sounds played sequentially or randomly for the same velocity. This process, called round robin, adds a lot of realism. It avoids “machine gun” effect when a sound is repeated several times identically.
To get the total number of samples to record, you can use the formula: number of notes × number of velocity layers × number of round robins. The more samples you record, the better the result will be, but the longer the recording, cleaning and programming work will take. So you should find a compromise depending on the time available and the result you are aiming for. To start, I recommend around 5 velocity levels and two layers of round robin.
For this article, I will take the example of a componium that I sampled recently. This instrument is a kind of music box that uses a perforated tape instead of a roll. It can therefore play as many songs as you want. It is a free vibrating instrument (whose sound is not maintained) and it has 30 different notes.
The interest of sampling this instrument is to free yourself from the very long and tedious preparation of the music rolls, which includes printing and piercing to cardboard sheets.
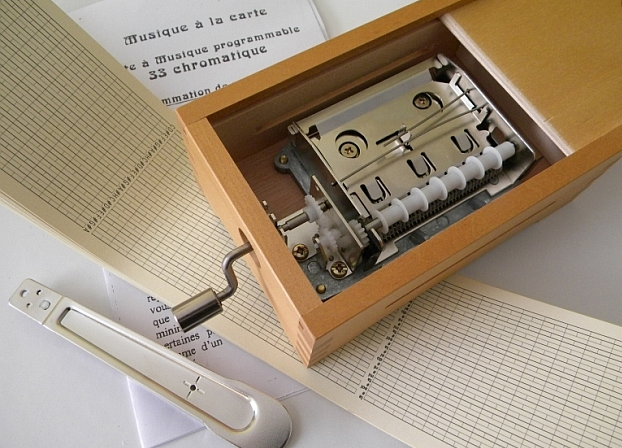
On this instrument, each note has its own sound character and its imperfections. Some notes resonate more than others, the tuning is not perfect, etc. I chose to keep to record each note three times, to have three layers of round robin. On the other hand, the sounds of this instrument are triggered mechanically, always with the same force. There is therefore no need to record multiple velocity layers, which greatly reduces the amount of work. I have a total of 30 × 3 or 90 notes to record.
Step 2: Samples recording
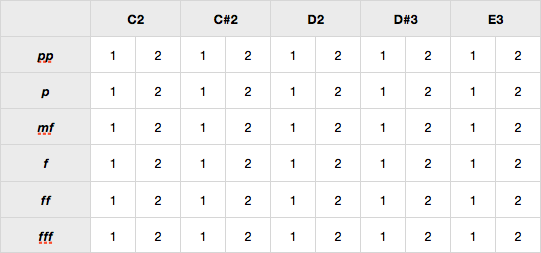
First of all, I recommend establishing a checklist to prevent possible oversights. You just have to check each good take after you record it. Here is an example with 6 layers of velocity, from pianissimo to fortissimo and two layers of round robin.
Microphone choice
You can use multiple microphones to have mixing possibilities inside the final virtual instrument. With stereo files, you can either make a stereo AB or XY sound take, use a close microphone and a distant one, or even use an acoustic microphone and a contact microphone.
For my componium, I chose this last option, I decided to record it in mono with a Brauner mic and add a contact mic to get more low and mid frequencies. This gives more “heat” to the slightly metallic sound of the music box. In the final virtual instrument, I will be able to freely adjust the two microphones to adjust the sound. I can also spatialize the notes to recreate a stereo effect.
Then, I set up my microphones as for a classic instrumental sound recording. I will not go into the details of the sound recording because there are many articles and books on the subject. However, it should be noted that the quality of the recording is extremely important, more than for a “standard” musical sound recording. Samples should have the best signal-to-noise ratio. Indeed when several notes are played simultaneously in the sampler, several samples are triggered, and their background noise is added. It is very noticeable in long sustains, as is this case.
I use a portable multitrack recorder (Sound Devices) and I work in a studio without any other device on. I thus get rid of all unwanted sounds, such as computer fans, ventilation, transformers, etc. You must also be particularly attentive to the sounds of our body (breathing in particular) because you are used to them and you might not detect them while recording.
Then I record each sample according to the list. It is important to listen to the sustain of each note. In general, I record an extra take for each velocity level, for safety.
Recording samples is the most important phase, because it determines the sound of the virtual instrument. The key word in this step is patience. Recording can take a long time, so don’t hesitate to take breaks!
Step 3: Edition
Once the recording is over, you must cut, clean and rename each sound sample.
For sample edition, I use Protools digital audio station, but you may use any DAW you want: Cubase, Live, Logic Pro, etc.
Sample trimming and cuts have to be precise. Be careful not to leave any silence at the start of the sample, because this will induce latency in the final virtual instrument. You should also be careful to fade out samples so that you don’t hear clicks or discontinuity in the background noise.
Then name each sample with the name of the note. It will be recognized automatically in some samplers. The name of the note must be that of the American notation: C, D, E, F, G, A, B possibly followed by a #. Logic’s EXS24 sampler does not recognize the b (for flat) denomination. So prefer A# to Bb. Add the number corresponding to the octave, for example C#4.
After my samples are cut and named, I clean them with Izotope RX. With this software you can reduce background noise and manually remove interferences.

Step 4: Programming
This step is probably the most exciting because the virtual instrument comes to life.
Import all the sounds into a sampler like Kontakt or Logic EXS24. There are several ways to import sounds. EXS24 detects the pitch according to the name of the note. After that you should check, using a midi keyboard, that the note played corresponds to the note heard.
Then assign to each note a velocity range. There are 128 velocity levels in MIDI, from 0 to 127. 0 is the lowest velocity (the key is pressed very slowly) and 127 is the highest (the key is hit with force). If you have 6 velocity levels, you must divide the levels from 0 to 127. For example:
– 0 to 19: pp
– 20 to 39: p
– 40 to 59: mp
– 60 to 79: mf
– 80 to 99: f
– 100 to 127: ff
Then you should assign each sample to a group corresponding to its round robin layer. This step is a bit long to go through, so here is a video guide:
Step 5: Fine-tuning
When all sound are programmed, you can start testing the instrument and make some adjustments such as volume and sample tuning. This homogenizes the overall sound of the instrument. Use your ear, a bit like a piano tuner. Here are some parameters to check:
– The absence of holes (no sample for a given note or velocity range).
– The absence of redundancies (several samples that are triggered when a single key is pressed).
– The correct distribution of the velocity layers.
– The homogeneity of sound volume between the different notes (no notes too strong or too weak at equal velocity). By this, we can play a chromatic sequence because this parameter is difficult to verify with a keyboard. Make sure to respect the sound of the original instrument.
– The tuning.
– The sequence of round robin layers.
– The sound envelope and looping for non-percussive samples.
Finally, here is a little improvisation with the final virtual instrument:
For any questions or if you need me to sample a special instrument, you can contact me on the contact page.
